https://blog.jurep.dev/article/how-does-supabase-auth-actually-work
How does supabase auth actually work?
In the age of AI and LLM's, Supabase has become one of the most used technologies for database hosting and backend development. It offers everything one would need to create their application.
One of the most inviting features of supabase is their authentication service which is ready for use straight out of the box. While this is very useful you can quickly risk your users data if you use it wrong. This article will dive deep into how the Supabase authentication service actually works so you can make better decisions while developing your application.
So how does it work?#
Supabase offers an authentication server that signs something called a JSON web token which I will refer to as JWT for the rest of the article. JWT is a special kind of token that carries base64 encoded data in JSON format about the users session. This data serves as authentication and can carry some data about the logged in user. One of the most common values that the token carries is probably the userId which corresponds to a user record in the users table in your auth schema. Another common value you can find in this token is a role which you can use in your authorization flow to determine which data that user has access too. Since this token is base64 encoded, anyone can see the contents and you should avoid adding sensitive data to it.
Now at this point you might be asking yourself, why can't someone just make their own token and encode it to base64 to avoid all the restrictions? We will answer this soon!
What is the JSON Web Token?#
As previously discussed the JWT is a base64 encoded string that is made up of three parts separated by a dot (.):
eyJhbGciOiJFUzI1NiIsImtpZCI6IjU5MGVkNzQ1LTNmYWEtNDRkYy04NmQxLTljZjY3ZTc2ZjVhZSIsInR5cCI6IkpXVCJ9
.eyJhYWwiOiJhYWwxIiwiYW1yIjpbeyJtZXRob2QiOiJwYXNzd29yZCIsInRpbWVzdGFtcCI6MTc4MjU3MTQ1Nn1dLCJhcHBfbWV0YWRhdGEiOnsicHJvdmlkZXIiOiJlbWFpbCIsInByb3ZpZGVycyI6WyJlbWFpbCJdfSwiYXVkIjoiYXV0aGVudGljYXRlZCIsImVtYWlsIjoianVyZUBleGFtcGxlLmNvbSIsImV4cCI6MTc4MjU3NTA1NiwiaWF0IjoxNzgyNTcxNDU2LCJpbnRlcm5hbF9hcHBfcm9sZSI6InVzZXIiLCJpc19hbm9ueW1vdXMiOmZhbHNlLCJpc3MiOiJodHRwOi8vMTI3LjAuMC4xOjU0MzIxL2F1dGgvdjEiLCJwaG9uZSI6IiIsInJvbGUiOiJhdXRoZW50aWNhdGVkIiwic2Vzc2lvbl9pZCI6IjlhYmE0ODdkLWM4YjItNDNmNy04NTQ3LTIyNjI4NjQ1YWU4ZiIsInN1YiI6ImQ1MzhmODFmLWU5YjQtNDZlMC05MWFkLTE1N2M0MjlkZWQxNyIsInVzZXJfbWV0YWRhdGEiOnsiZW1haWwiOiJqdXJlQGV4YW1wbGUuY29tIiwiZW1haWxfdmVyaWZpZWQiOnRydWUsImZpcnN0X25hbWUiOiJKdXJlIiwibGFzdF9uYW1lIjoiRXhhbXBsZSIsInBob25lX3ZlcmlmaWVkIjpmYWxzZSwic3ViIjoiZDUzOGY4MWYtZTliNC00NmUwLTkxYWQtMTU3YzQyOWRlZDE3In19
.fiOtNlqULEm7Y6uYaXrL9BYiOi0RFKmBXyawxMlEfUAm1CysdU8kJsvZPBin3aJhvfD9X6Rk7FnjYbytWSGv3A
The three parts of the token are called the "Header", "Payload" and "Signature". To make sure the tokens are valid the signature is created (signed) using a private key and the payload. We will talk more about signatures later.
The Header#
If we decode the part before the first separator:
eyJhbGciOiJFUzI1NiIsImtpZCI6IjU5MGVkNzQ1LTNmYWEtNDRkYy04NmQxLTljZjY3ZTc2ZjVhZSIsInR5cCI6IkpXVCJ9We get something like this:
{
  "alg": "ES256",
  "kid": "590ed745-3faa-44dc-86d1-9cf67e76f5ae",
  "typ": "JWT"
}
This is what we call the "Header" of the JWT. Header contains some metadata about the token.
The "alg" value tells us that this token was created using Elliptic Curve Digital Signing Algorithm (ES) and SHA-256 (256) for hashing.
The "kid" value is a unique id that tells us which public key can be used to verify the signature which is the third part of the JWT and we will talk about it later.
The "typ" value tells us the type of the token. Not all tokens are JSON Web Tokens even though they are the most common type. Most of the time you can simply ignore this value.
The Payload#
The middle part of the token is called the payload. Payload contains the actual data about the logged in user. This is the payload of the token mentioned before:
eyJhYWwiOiJhYWwxIiwiYW1yIjpbeyJtZXRob2QiOiJwYXNzd29yZCIsInRpbWVzdGFtcCI6MTc4MjU3MTQ1Nn1dLCJhcHBfbWV0YWRhdGEiOnsicHJvdmlkZXIiOiJlbWFpbCIsInByb3ZpZGVycyI6WyJlbWFpbCJdfSwiYXVkIjoiYXV0aGVudGljYXRlZCIsImVtYWlsIjoianVyZUBleGFtcGxlLmNvbSIsImV4cCI6MTc4MjU3NTA1NiwiaWF0IjoxNzgyNTcxNDU2LCJpbnRlcm5hbF9hcHBfcm9sZSI6InVzZXIiLCJpc19hbm9ueW1vdXMiOmZhbHNlLCJpc3MiOiJodHRwOi8vMTI3LjAuMC4xOjU0MzIxL2F1dGgvdjEiLCJwaG9uZSI6IiIsInJvbGUiOiJhdXRoZW50aWNhdGVkIiwic2Vzc2lvbl9pZCI6IjlhYmE0ODdkLWM4YjItNDNmNy04NTQ3LTIyNjI4NjQ1YWU4ZiIsInN1YiI6ImQ1MzhmODFmLWU5YjQtNDZlMC05MWFkLTE1N2M0MjlkZWQxNyIsInVzZXJfbWV0YWRhdGEiOnsiZW1haWwiOiJqdXJlQGV4YW1wbGUuY29tIiwiZW1haWxfdmVyaWZpZWQiOnRydWUsImZpcnN0X25hbWUiOiJKdXJlIiwibGFzdF9uYW1lIjoiRXhhbXBsZSIsInBob25lX3ZlcmlmaWVkIjpmYWxzZSwic3ViIjoiZDUzOGY4MWYtZTliNC00NmUwLTkxYWQtMTU3YzQyOWRlZDE3In19If we decode it we get something like this:
{
  "aal": "aal1",
  "amr": [
    {
      "method": "password",
      "timestamp": 1782571456
    }
  ],
  "app_metadata": {
    "provider": "email",
    "providers": [
      "email"
    ]
  },
  "aud": "authenticated",
  "email": "jure@example.com",
  "exp": 1782575056,
  "iat": 1782571456,
  "internal_app_role": "user",
  "is_anonymous": false,
  "iss": "http://127.0.0.1:54321/auth/v1",
  "phone": "",
  "role": "authenticated",
  "session_id": "9aba487d-c8b2-43f7-8547-22628645ae8f",
  "sub": "d538f81f-e9b4-46e0-91ad-157c429ded17",
  "user_metadata": {
    "email": "jure@example.com",
    "email_verified": true,
    "first_name": "Jure",
    "last_name": "Example",
    "phone_verified": false,
    "sub": "d538f81f-e9b4-46e0-91ad-157c429ded17"
  }
}
As you can see there is quite a lot of data here. Some of these values are pretty self explanatory so I will only go over the most important ones.
"sub" shows us the "Subject" of the JWT. In this case the "sub" is the id of the user that is stored in the users table
"role" shows us the role of the user. In most cases this is pretty obvious but in the case of Supabase this field has Supabase roles. Authenticated role means the user is logged in.
"session_id" shows the id of the users session. You can use this value to query the users session in the database to check if the user is banned
"iss" is the issuer and in this example point to an auth server on my local Supabase instance
"aud" is the audience. This value tells us who the token is for. We can see that the token is meant for the Authenticated user and seeing as the users role is also Authenticated we can see that this is in fact valid
"exp" and "iat" are two times. "exp" tells us when the token expires and "iat" tells us when it was created
"internal_app_role" is my custom claim that was added so the app can have additional role scoped permissions
"app_metadata" shows us what the user used to sign in and an array of sign in providers the user has available
The Signature#
Now we get to the fun part. The signature is the third part of the token which makes sure the auth flow is secure.
Unlike the first two parts, the signature does not actually decode into a JSON object. Instead the signature contains 2 long integers commonly called "r" and "s". These two values are created when the JWT is singed and can only be obtained on the auth service. To get these values the server creates a hash using the SHA-256 hashing algorithm. Using this hash, the private key and some temporary randomly generated value the algorithm creates a pair of integers (r,s) which represent the signature of the token. The private key is only known to the auth service and as such the auth service is the only service that can create JSON Web Tokens.
Since the private key only lives on the auth service we cannot repeat the process when verifying the token on our REST API. In order to check if the token is actually valid without calling the auth service for every request that lands in our API we can use a different process. To verify the signature on our API we need to read the values in the signature (r,s). Using these values along with a public key and the "G" and "n" constants defined by the standard we can calculate the coordinates of a point on the elliptic curve. If the "x" coordinate of the calculated point matches the "r" value from the signature we can assume the token is valid. The math behind this is really interesting so I suggest you read more about it using the links in the references section at the end of the article.
What is the Public Key?#
The public key is the corresponding pair to the private key which can be publicly distributed without fear of leaking the private key. While it is theoretically possible to figure out the private key from the public key in quantum computing, it is actually impossible to do it in practice until we actually get quantum computers.
To fetch the public keys from Supabase you can simply use the issuer url form the JWT and add the url for the "jwks.json" like this http://127.0.0.1:54321/auth/v1/.well-known/jwks.json. If you paste this link into your browser while running a local supabase instance you will get something like this:
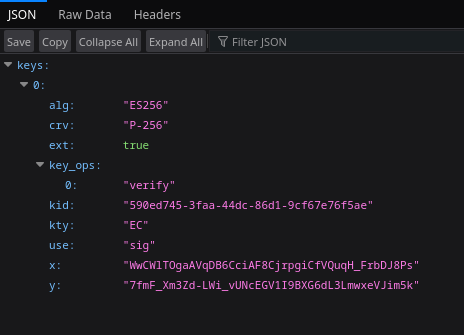
Caching this json in your REST API will allow you to validate tokens without calling the actual supabase auth service for every request. This will improve the performance of your app.
Conclusion#
As you can see the JSON Web Tokens are a really useful way of performing authentication and authorization for your users. One thing to keep in mind though is that these tokens are stateless so if you ban a user the token will remain valid until it expires (default life time of a token on supabase is 1 hour). For most applications this is acceptable but if you need the ban to apply immediately you will have to query the database for session data on every request, or cache the session data for users using something like Redis.
I hope this article shined some light on what is actually happening with Supabase auth so you can make more informed decisions while working with Supabase.
References#
Elliptic Curve Digital Signature
Supabase signing keys
Supabase JWT
JSON Web Signature
Elliptic Curve Cryptography